Trimming your dog’s nails is an essential part of their grooming routine, but many pet owners find it a daunting task. Whether your dog is nervous about nail trimming or you’re simply unsure how to do it safely, don’t worry. With the right approach and tools, you can learn how to trim your dog’s nails at home in a way that’s stress-free for both you and your dog.
In this article, we’ll walk you through five easy steps to help you trim your dog’s nails safely, making it an enjoyable experience for your furry friend. Keep reading for expert tips, common mistakes to avoid, and how to prepare your dog for a successful nail trimming session.
First off: Why Nail Trimming is Important

Nail trimming plays a crucial role in your dog’s health. If left untrimmed, long nails can cause several problems, including:
- Pain and Discomfort: Overgrown nails can press into your dog’s paw pads, leading to pain or even infections.
- Mobility Issues: Long nails can make walking uncomfortable for your dog, potentially causing them to adjust their posture and gait, leading to joint stress.
- Injury Risk: Long nails are more prone to breaking or getting caught on surfaces, which can result in painful injuries.
- Hygiene: Dogs that don’t get their nails trimmed regularly may also experience excessive dirt buildup under the nails.
By trimming your dog’s nails regularly, you’re ensuring that they stay comfortable and mobile, minimizing health risks.
Step 1: Gather the Right Tools for the Job
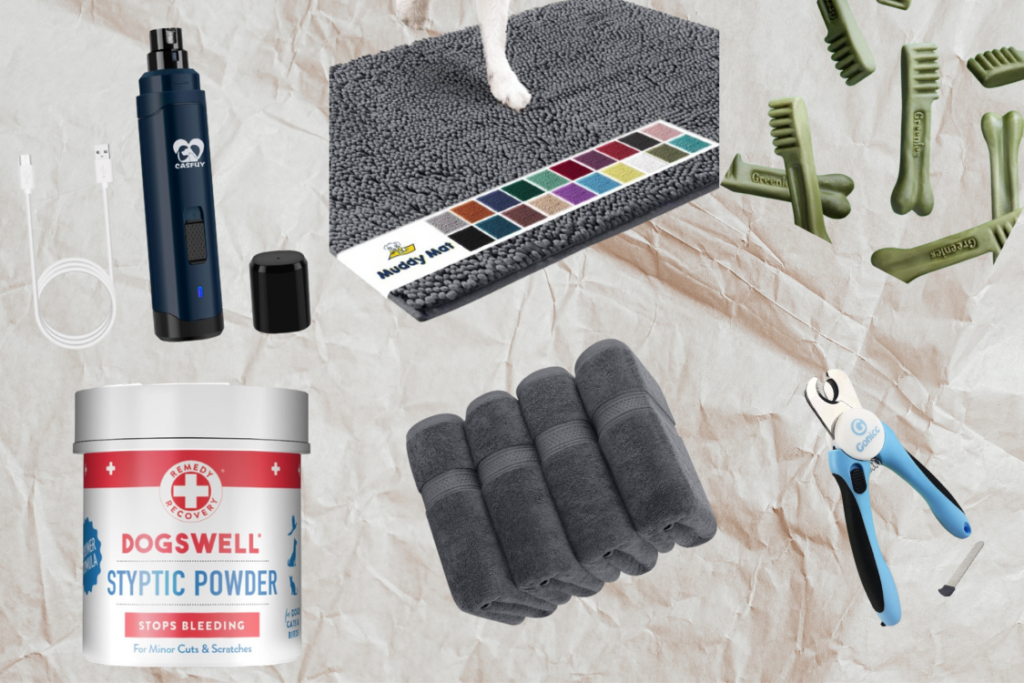
The first step in safely trimming your dog’s nails is making sure you have all the right tools. Using the right equipment will ensure a smoother and safer process for both you and your dog.
What You’ll Need:
- Nail Clippers or a Grinder: Choose between nail clippers or a dog nail grinder. Nail clippers are quick and effective when kept sharp and used with care. A dog nail grinder on the other hand, can be a great option for dogs who are sensitive to clipping or need a smoother finish.
- Styptic Powder: This is a must-have in case you accidentally cut too close to the quick (the sensitive part of the nail). It helps stop bleeding quickly.
- Treats: Positive reinforcement is crucial to make the process less stressful for your dog. Have their favorite treats ready as a reward for good behavior.
- A Towel or Mat: To provide a stable, non-slippery surface during the trimming process.
Step 2: Get Your Dog Comfortable and Calm

If your dog is nervous or excited, it’s essential to create a calm and stress-free environment before you begin trimming their nails. Try to keep the atmosphere relaxed so that your dog associates nail trimming with a positive experience.
Tips for Calming Your Dog:
- Choose a Quiet Area: Select a calm space where your dog feels comfortable, like a cozy room, quiet corner or favorite comfy bed. Avoid distractions that could heighten your dog’s anxiety.
- Gently Handle Their Paws: Before trimming, take some time to handle your dog’s paws regularly. Massage their feet and get them used to having their nails touched. This will reduce any fear they may have about having their paws handled during the trimming process.
- Give Them Treats and Praise: Offer your dog positive reinforcement throughout the process. Praise them for calm behavior and reward them with treats.
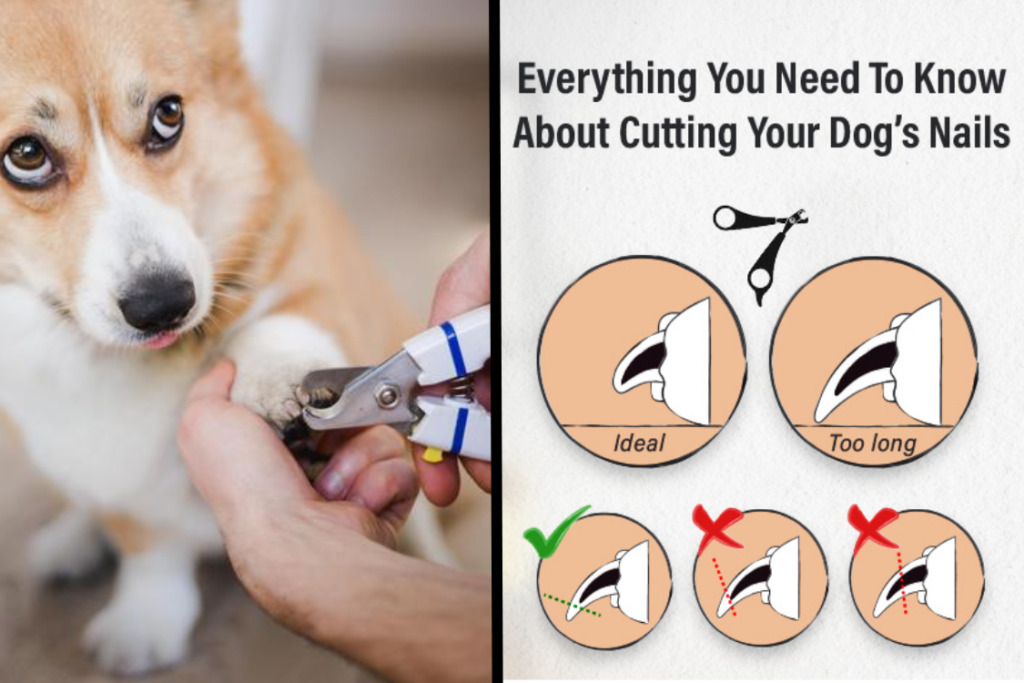
Step 3: Learn to Identify the Quick
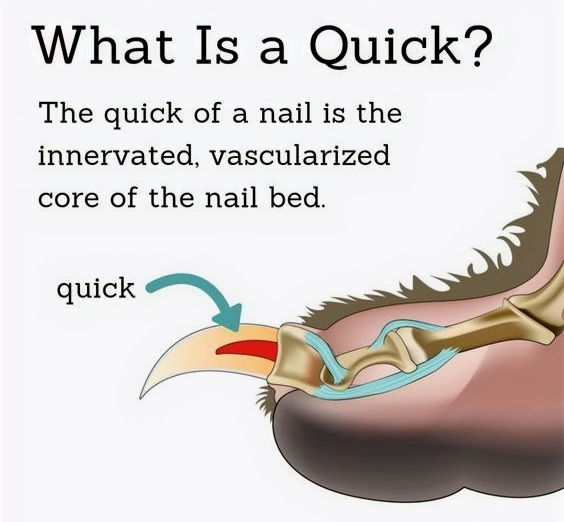
The quick is the most sensitive part of your dog’s nail. It contains blood vessels and nerves, and cutting into it can cause pain and bleeding. It’s important to know where the quick is located before you start trimming to avoid injury.
How to Identify the Quick:
- For Light-Colored Nails: It’s easier to spot the quick in dogs with light-colored nails, as you’ll notice a pinkish area inside the nail. Avoid cutting into this area.
- For Dark-Colored Nails: It’s trickier to identify the quick in dogs with dark-colored nails. In these cases, trim a small bit at a time, carefully observing the nail’s underside. If you see a black dot in the center of the nail, stop there, as that’s where the quick begins.
How to Avoid Cutting the Quick:
- Trim Small Amounts at a Time: Trim a little bit of the nail with each clip, especially if your dog has dark nails. This will give you better control over the process and reduce the chances of cutting the quick.
- Use a Nail Grinder: If you’re worried about cutting too close to the quick, using a nail grinder allows you to file the nail down slowly and safely.
Step 4: Trim the Nails with Care

Once you’re ready to begin, set up a calm and secure environment for your dog. A comfortable setup goes a long way in making the trimming process easier for both of you.
How to Trim Your Dog’s Nails:
- Place Your Dog on a Towel or Non-Slip Mat: Start by placing your dog on a soft towel or rubber mat to prevent slipping and help them feel secure. This creates a stable surface and reduces anxiety.
- Start with One Nail at a Time: Hold your dog’s paw gently but firmly, and focus on trimming one nail at a time.
- Use Steady Pressure: Whether using clippers or a grinder, apply gentle, steady pressure. Avoid rushing—slow and calm is key.
- Trim in Small Increments: Take off just a little at a time. This minimizes the risk of hitting the quick and hurting your dog.
- Don’t Forget the Dewclaws: These nails, located higher up on the paw, can grow long quickly and are often forgotten.
Step 5: Reward Your Dog for Their Good Behavior
After the trimming session, it’s time to celebrate your dog’s good behavior! Offering praise and rewards is key to making the experience positive and ensuring your dog remains comfortable with nail trimming in the future.
How to Reward Your Dog:
- Give Treats: Immediately after finishing the nail trimming, give your dog a treat they love. This will help them associate the experience with something positive.
- Offer Praise and Affection: Verbally praise your dog for being cooperative and offer them plenty of belly rubs and attention to make them feel appreciated.
Keep a Regular Nail Trimming Schedule
Regular nail trimming is important for your dog’s health. Ideally, you should trim your dog’s nails every 3–4 weeks, but this can vary depending on your dog’s breed, activity level, and whether they naturally wear down their nails. Tracking your dog’s nail trimming schedule can help you stay consistent.
Nail Trimming Doesn’t Have to Be Stressful

By following these five easy steps, you can safely and effectively trim your dog’s nails at home. Remember, the key is to take it slow, use the right tools, and reward your dog for good behavior. With practice and patience, nail trimming can become a simple and stress-free part of your dog’s grooming routine.
If you encounter any difficulties or if your dog seems overly stressed, don’t hesitate to consult your vet or a professional groomer for additional guidance. Nail care is an important part of your dog’s overall health, so make sure to stay consistent with trimming their nails to keep them comfortable and pain-free becouse it is an essential part of their grooming routine.